
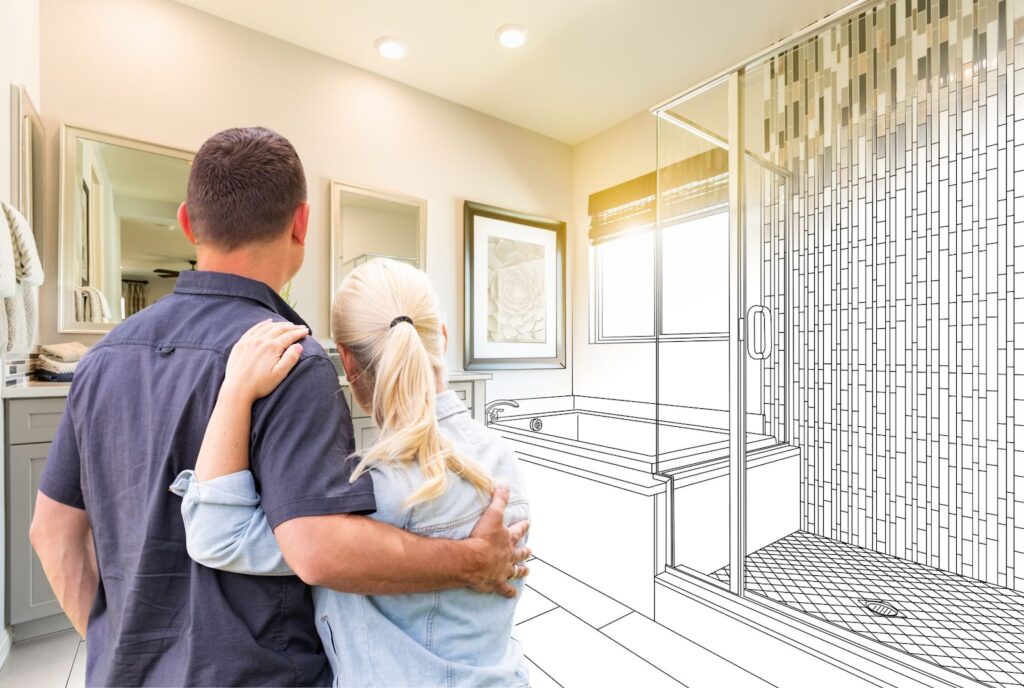
Transforming your bathroom can be a game-changer for your home. It’s about upgrading fixtures and finishes and creating a space that enhances your daily routine. A well-thought-out bathroom renovation adds comfort, functionality, and value to your home, making it a wise investment.
You need a solid plan before you start tearing down walls or picking out tiles. Planning ensures you stay on budget, meet your needs, and avoid common pitfalls. This guide will help you navigate each step, from setting a budget to selecting the perfect fixtures, ensuring your bathroom remodel goes smoothly and effectively.
Get ready to roll up your sleeves and dive into the exciting world of bathroom renovation. With careful planning and the right approach, you can turn your bathroom into a stunning oasis that meets all your needs.
Let’s break down the process step-by-step so you are able to confidently tackle your home bathroom remodel and create the bathroom of your dreams.
Step 1: Assess your needs and set your goals
Before starting your bathroom renovation, take some time to evaluate your current bathroom. What do you like about it? What needs improvement? Consider the functionality, layout, storage, and aesthetics. Make a list of your must-haves and nice-to-haves. This will help you prioritize your renovation goals.
Think about who will use the bathroom. A family bathroom will have different needs compared to a guest bathroom or a master suite. Consider accessibility features if you plan to age in place or have family members with mobility issues.
Defining your goals will give you a clear direction as you move forward with your home bathroom remodel.
Visualize how your ideal bathroom looks and feels. Do you want a spa-like retreat or a sleek, modern space? Think about the colors, materials, and lighting that will create the atmosphere you desire. This vision will guide your choices and help you stay focused on what you want to achieve.
Take note of any issues that need addressing, like poor lighting or lack of storage. Identify features that are important to you, such as a larger shower, a double vanity, or a soaking tub. Setting clear goals helps streamline the renovation process and ensures your new bathroom meets all your needs.
Step 2: Set a realistic budget
Setting a budget is crucial for any bathroom renovation. Determine how much you are willing to spend and stick to it. A clear budget helps you make informed decisions and avoid overspending. Break down your budget into categories such as fixtures, tiles, labor, and unexpected expenses.
Include a contingency fund for unforeseen issues. Plumbing problems or structural repairs can arise once the renovation begins. Allocate around 10-20% of your total budget for these unexpected costs. This safety net will ensure your project stays on track financially.
Research the cost of materials and labor in your area to get a realistic idea of expenses. Obtain multiple quotes from contractors to compare prices and services. Knowing the market rates will help you set a budget that aligns with your renovation goals without compromising quality.
Consider the long-term value of your investments. Spending more on high-quality materials and fixtures may save you money in the long run by reducing the need for repairs and replacements. Balancing initial costs with long-term benefits will help you make smart financial decisions.
Step 3: Plan your layout
A well-thought-out layout is the backbone of any successful bathroom renovation. Consider the existing plumbing and electrical systems. Moving these may be costly, so try to work within the current framework if possible. Think about the flow of the room and how you use the space.
Decide where you want to place the major components, such as the shower, bathtub, toilet, and sink. Make sure there is enough room for comfortable movement. Measure the space carefully and consider any structural changes that may be necessary. A good layout maximizes both functionality and aesthetics.
Think about storage solutions to keep your bathroom clutter-free. Incorporate built-in shelves, cabinets, and niches to make the most of available space. Plan for adequate ventilation and natural light to keep the bathroom fresh and bright. A well-planned layout will make your bathroom more enjoyable and practical.
Ensure that the layout supports ease of cleaning and maintenance — position fixtures to minimize hard-to-reach areas and ensure adequate space for maneuvering. Prioritize the flow and accessibility of your bathroom to enhance daily usability and comfort.
Step 4: Choose your style
Choosing a style for your bathroom sets the tone for the entire renovation. Whether you prefer a modern, minimalist look or a classic, traditional design, your style choices will guide your decisions on fixtures, colors, and materials.
Create a mood board with images, colors, and textures that inspire you. This visual guide will help you stay focused on your vision. Consider how the bathroom fits with the rest of your home’s decor. Consistency in style creates a cohesive and harmonious look.
Pay attention to the small details that reflect your chosen style.
Select hardware, lighting, and accessories that complement your overall design. Think about how different elements, like tile patterns or paint colors, work together to create a unified space. Your style choices will transform your bathroom into a personalized retreat.
Evaluate trends and timeless design features to ensure your bathroom remains stylish for years to come. Mixing classic elements with modern touches can create a balanced look. Remember to choose materials and fixtures that are beautiful and functional, enhancing the overall experience of your bathroom.
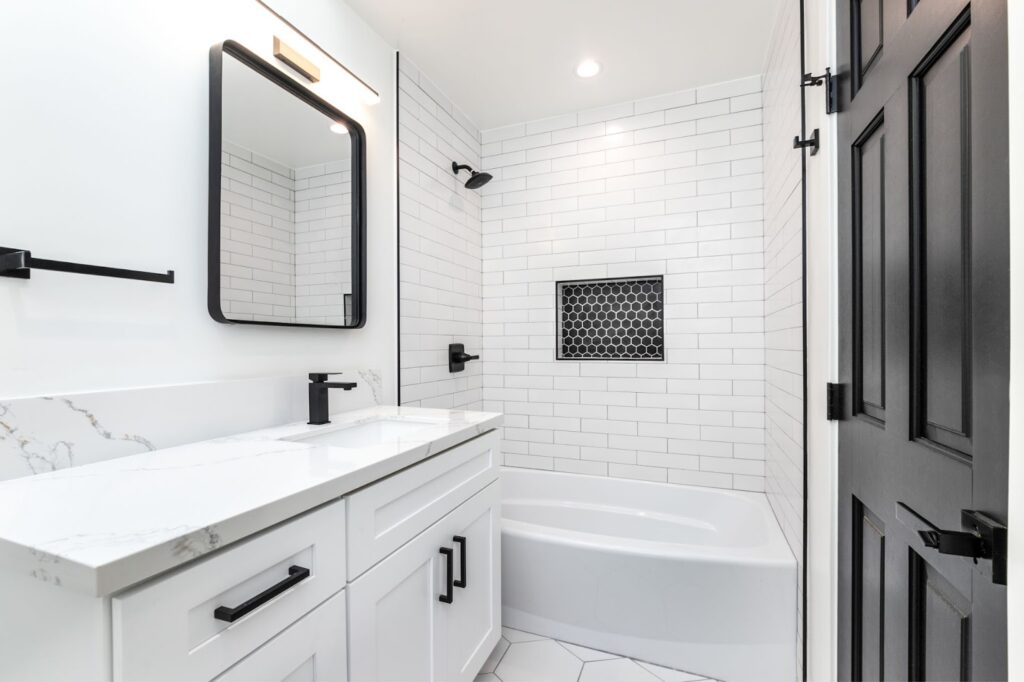
Step 5: Select fixtures and materials
Fixtures and materials play a significant role in the look and functionality of your bathroom. When selecting fixtures, consider durability, ease of cleaning, and aesthetic appeal. Choose high-quality materials that will stand up to moisture and daily use.
Consider materials like porcelain, acrylic, and stone for the bathtub, shower, and sink. These are durable and come in a variety of styles. For the flooring, tiles are a popular choice due to their water resistance and various designs.
Don’t forget about the small details like faucets, towel racks, and lighting fixtures. These elements add personality and complete the look of your bathroom.
Think about energy efficiency and water conservation when choosing fixtures. Low-flow showerheads and faucets reduce water usage without sacrificing performance. LED lighting options offer longevity and lower electricity bills. Selecting eco-friendly materials and fixtures benefits the environment and adds value to your home.
Consider the maintenance needs of different materials. Some surfaces require more care to keep them looking their best. Research the upkeep of your chosen materials to ensure they fit your lifestyle. A well-informed choice will keep your bathroom looking fresh and new for years to come.
Step 6: Hire professionals
Hiring the right professionals can make or break your bathroom renovation. Look for contractors with experience in bathroom remodels. Ask for references and check online reviews. Meet with several contractors to discuss your project and get detailed estimates.
A good contractor will provide a clear timeline and keep you updated throughout the renovation. They will also handle any necessary permits and inspections. Trust your instincts and choose someone who communicates well and understands your vision.
Ensure your contractor provides a comprehensive contract that outlines the scope of work, payment schedule, and warranty information. This document protects both parties and sets clear expectations. Building a good rapport with your contractor ensures a smoother renovation process and better results.
Discuss your expectations and establish regular check-ins to monitor progress. A professional who values transparency and is responsive to your concerns will create a more collaborative and stress-free renovation experience. Choose professionals who respect your home and work diligently to bring your vision to life.
Step 7: Demolition and prep work
Once you have your plan and permits, it’s time to start the demolition. This step involves removing old fixtures, tiles, and any other elements that will be replaced. Be prepared for noise and dust, and take steps to protect the rest of your home.
Shut off utilities such as water, gas, and electricity properly before starting the demolition. This prevents accidents and makes the process safer. Proper preparation sets the stage for a smooth renovation.
Remove debris and old materials promptly to keep the worksite clean and organized. This helps prevent accidents and allows the renovation to proceed efficiently. Plan for waste disposal and recycling to manage the environmental impact of your renovation.
Cover floors and furniture outside the work area to protect them from dust and debris. Use heavy-duty plastic sheets and painter’s tape to seal off doorways and vents. This minimizes the spread of dust throughout your home, making post-renovation cleanup easier.

Step 8: Plumbing and electrical work
With the old bathroom stripped back, it’s time to update the plumbing and electrical systems. This step is crucial for supporting new fixtures and ensuring everything functions correctly. Hire licensed professionals to handle these updates. They will ensure the work meets safety standards and local building codes.
Consider installing energy-efficient fixtures and water-saving devices. These upgrades reduce your utility bills and make your bathroom more environmentally friendly. Proper plumbing and electrical work are the foundations of a functional bathroom.
Plan the placement of electrical outlets and light switches for convenience and safety. Think about adding extra outlets for modern bathroom gadgets and appliances. Ensure that the plumbing layout optimizes water pressure and minimizes wait times for hot water, enhancing your overall bathroom experience.
Incorporate safety features like GFCI outlets to prevent electrical hazards in wet areas. Consider a dedicated circuit for high-energy appliances like heated towel racks or whirlpool tubs. Proper planning during this stage ensures your bathroom meets current and future needs.
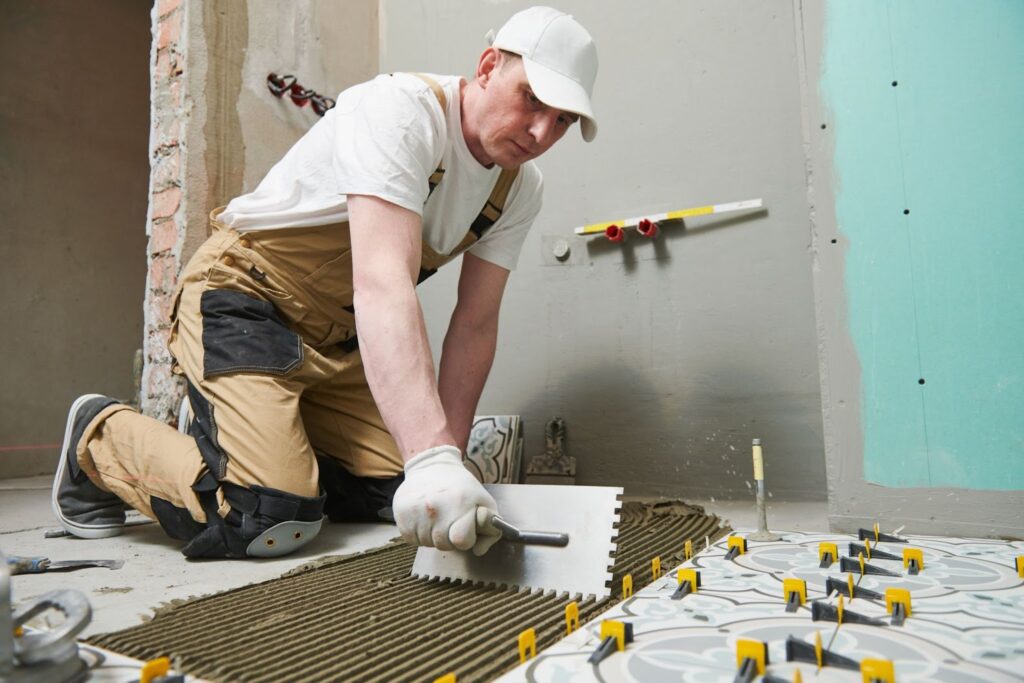
Step 9: Install flooring
Installing new flooring is a major step in your bathroom renovation. Choose a material that is durable, water-resistant, and fits your style. Popular options include ceramic tiles, porcelain tiles, and vinyl. Each material has advantages, so consider what works best for your needs.
Proper installation is key to long-lasting flooring. Ensure the subfloor is level and dry before laying the new flooring. This prevents future issues such as cracking or warping. If you want it done correctly, you’ll want a professional.
Think about the maintenance requirements of different flooring options. Tiles are easy to clean and maintain, while vinyl offers comfort underfoot and is less cold in winter. Incorporate slip-resistant features to enhance safety, especially in a frequently wet environment like a bathroom.
Select grout that complements your tile choice and is resistant to mold and stains. Use underfloor heating for added comfort, especially with tiles that tend to get cold. These considerations will help you create a bathroom floor that is both beautiful and practical.
Step 10: Install walls and ceilings
After the flooring is in place, focus on the walls and ceilings. This step includes installing drywall, waterproofing, and tiling. Choose moisture-resistant materials to prevent mold and mildew. For a polished look, consider adding wainscoting or beadboard.
If you plan to tile the walls, choose a design that complements your overall style. Subway tiles are a classic choice, while mosaic tiles add a touch of luxury. Properly seal all tiles to prevent water damage. Attention to detail in this step creates a high-quality finish.
Incorporate insulation behind walls to improve energy efficiency and soundproofing. Select paint or finishes that withstand high humidity and frequent cleaning. Plan for adequate ventilation, such as an exhaust fan, to keep moisture levels in check and maintain a fresh environment.
Step 11: Install cabinets and countertops
Cabinets and countertops are essential for storage and functionality in your bathroom. Choose materials that withstand moisture and frequent use. Popular options for countertops include granite, quartz, and solid surface materials. For cabinets, look for water-resistant finishes and durable construction.
Install cabinets and countertops securely, ensuring they are level and properly anchored. Consider custom-built options for a tailored fit and unique design. These elements provide practical storage and add to the overall aesthetic of your bathroom.
Think about the layout and placement of cabinets to maximize storage space. Utilize vertical space with tall cabinets or wall-mounted units. Opt for soft-close drawers and doors to enhance the longevity and quiet operation of your cabinets.
Step 12: Install fixtures
With the major elements in place, it’s time to install the fixtures. This includes the bathtub, shower, toilet, and sink. Properly connect each fixture to the plumbing and securely install it. Test all connections for leaks and proper function.
Choose fixtures that complement your design and meet your functional needs. A rain shower head adds luxury, while a dual-flush toilet saves water. These choices enhance the usability and comfort of your bathroom.
Consider accessibility when selecting and placing fixtures. Install grab bars in showers and near toilets for added safety. Select a sink height that accommodates all users, and opt for a walk-in shower or bathtub if mobility is a concern.
Step 13: Install lighting
Proper lighting is essential in a bathroom. It improves functionality and creates ambiance. Combine different types of lighting to achieve the best results. Task lighting illuminates the vanity area, while ambient lighting provides overall illumination. Accent lighting highlights design features and adds a decorative touch.
Choose energy-efficient LED lights for long-lasting performance and lower energy bills. Position lights strategically to eliminate shadows and ensure even lighting. Good lighting makes your bathroom more practical and visually appealing.
Install dimmer switches to control the light levels and create a relaxing atmosphere. Ensure vanity lights are bright enough for grooming tasks without creating harsh shadows. Consider adding a skylight or larger window to increase natural light and ventilation.
Select fixtures that match your bathroom’s style, whether modern or traditional. Recessed lighting can add a sleek, unobtrusive look, while decorative pendants or sconces provide charm and character. Position lights to avoid glare on mirrors, enhancing the usability of your space.
Step 14: Paint and finish
Painting and finishing touches bring your bathroom renovation together. Choose paint colors that complement your tiles and fixtures. Lighter colors make small spaces feel larger, while bold colors add drama and personality.
Use moisture-resistant paint to prevent mold and mildew. Apply multiple coats for a smooth, durable finish. Add finishing touches like trim, molding, and hardware to complete the look. These details add character and polish to your bathroom.
Don’t overlook the ceiling; painting it a lighter shade than the walls will add height to the room. Use painter’s tape to achieve clean lines and protect your fixtures and tiles. Once the paint dries, carefully inspect for any touch-ups needed to ensure a flawless finish.
Consider adding an accent wall or decorative stenciling for an extra touch of style. To maintain air quality, pay attention to ventilation, especially when using oil-based paints. Your choice of finishes and textures in paint can also affect the bathroom’s ambiance, from matte for a soft look to glossy for a sleek feel.
Step 15: Add accessories and decor
The final step in transforming your bathroom is adding accessories and decor. This includes mirrors, towels, rugs, and artwork. Choose items that reflect your style and enhance the functionality of the space.
Storage solutions like baskets and shelves should be considered to keep the bathroom organized. Add plants for a touch of greenery and freshness. Personalize the space with items that make it feel like your own. Accessories and decor complete the transformation and make your bathroom a welcoming retreat.
Opt for a large mirror to make the space appear bigger and brighter. Choose towel racks and hooks that match your fixtures for a cohesive look. Soft, plush rugs add comfort and warmth, especially in front of the sink and tub.
Incorporate functional decor like a stylish soap dispenser, a decorative toothbrush holder, and a matching tissue box cover. Use scented candles or diffusers to add a pleasant aroma and enhance the relaxing atmosphere. Thoughtfully selecting each accessory creates a harmonious and inviting bathroom space.
Final thoughts
As you wrap up your bathroom renovation, take a moment to appreciate the transformation. You’ve turned an ordinary space into a personalized sanctuary that combines style and function. Every decision, from the layout to the fixtures, reflects your vision and hard work.
Your new bathroom isn’t simply a room; it’s a daily retreat that enhances your lifestyle. Whether you aim for a spa-like atmosphere or a sleek, modern look, the results speak for themselves. You’ve created a space that brings joy and adds significant value to your home.
Feel proud of what you’ve accomplished. Transforming your bathroom is no small feat, but with careful planning and execution, you’ve achieved something remarkable. Enjoy your beautiful new bathroom, and let it inspire confidence in tackling future home improvement projects.
Trust Renovate Ease with all your home renovation needs.
At Renovate Ease, we understand the nuances of home remodeling and dedicate ourselves to making your home makeover journey seamless and rewarding.
Our team of professionals is committed to guiding you through each step, guaranteeing that your project adheres to the highest standards of quality and craftsmanship.
Ready to elevate your home? Partner with Renovate Ease. We bring expertise, dedication, and a passion for excellence to every home remodeling project.
We use top-tier materials and the latest technology to deliver results that are not only stunning but also durable and sustainable.
Whether upgrading a kitchen, revamping a bathroom, or transforming your entire home, we maintain the same level of precision and professionalism to ensure your complete satisfaction.
We believe in transparent and open communication as the foundation of successful projects. From the first consultation to the final inspection, you’ll receive regular updates and have direct access to our project managers, always ready to address your questions and concerns.
This commitment to client interaction allows us to tailor our efforts to your unique needs and preferences, turning your vision into our roadmap for success.
Reach out to Renovate Ease today, and let’s bring your dream bathroom to life.